Library Tool
- How to Add a New Folder
- Library folder form fields
- How to Reorder Library Folders, Subfolders, and Resources
- How to Add a New Library Resource
- Library resource form fields
- Approving a User-Submitted Resource
- How to Share-in Library Resources From Another Site
Library Tool Overview
.png)
This is the general view of the Library from a desktop, from which you can access different legal areas, and any relevant legal resources within the folders. From here you may also add events resources, and folders to the larger library. By clicking on the left side menu, you can access various library folders and subfolders and the contents within them. Alternatively, you can click on “Use filters to search by topic, resource type, etc.) to access the filtered view of the tool.
.png)
Mobile view of the site
How to Add a New Folder
Click the “Add Folder” link at the top right of the Library page.
.png)
The “Create Folder” form will open, and the fields that you are required to fill out will be marked with asterisks.
.png)
If you overlook a required field, the form will not submit, and the system will list the empty fields as issues at the top of the page.
.png)
Note: Titles are limited to 200 characters.
TIP: Click the missed / error field at the top of the form and the system move you directly to that field. This is so you don't have to look for it.
NOTE: Folders can contain both resources and additional subfolders.
Library folder form fields
.png)
Remember to note exactly where you're putting your new folder. In some cases, folders are placed within folders, and are many levels down. Be careful not to misplace your new folders in a subfolder or sub-subfolder. Make sure that your folder’s placement follows a logical, and consistent progression across the library.
Settings
.png)
You must switch the status of the new folder to Approved to see it in your library. Otherwise it will stay in your Admin Inbox under Awaiting Approval.
- Deleted places the folder in the Admin Inbox under Deleted items.
- More Information Requested and Rejected are useful internally as a way to mark folders you're not ready to publish or want someone else to review. Selecting either of these puts the folder in your Admin Inbox under the same category
How to Reorder Library Folders, Subfolders, and Resources
Once you have added folders and subfolders to your library, it's easy to rearrange them. You may also reorder individual resources within a folder. Just follow these steps:
On the left hand side of the library page is a list of the folders, and subfolders available. Navigate to the folder you want to move or whose contents you want to reorder, and click on the “edit” next to the folder name.
.png)
- Go to the “Ordering” section on the form. The first box, labeled "Subfolders", lists any subfolders in the folder being edited. Highlight a sub-folder and use the Up or Down arrows to change the order.
- The next box, labeled "Items", refers to individual resources. Highlight a resource and use the Up or Down arrows to change the order.
.png)
- Go to the Folder Location section on the form. Here you highlight which parent folder you want the folder you're editing to be placed in.
.png)
NOTE: Unless you are 100% certain, do not change the “Settings” of any library folders or subfolders. Doing so will make the folders/subfolders unavailable, and you will be unable to re-approve it. The resources in the folder can still be found in the topic view and in the Admin inbox, however, in order to view the resources in the Folder view, you will need to move the resources to a new folder before deleting a folder. We recommend that you leave the folder status as "Approved" until you have moved all items out of that folder.
How to Add a New Library Resource
Resources can be added to the library from any page. After you submit the resource, you will be returned to the page you were on before entering the admin form.
Click the “Add Resource” link at the top right of any Library page.
(1).png)
The library resource form will open with fields to be completed.
.png)
TIP: Click the missed / error field at the top of the form and the system will drop you directly into it within the form. This is so you don't have to look for it.
You can also add multiple resources using the "Add Multiples" button to upload multiple resources. You may also copy another resource if desired by clicking on the two pieces of paper icon (next to the edit symbol) on a library resource.
Library resource form fields
.png)
Title (Required)
Be as concise but descriptive as possible with titles.
NOTE: Do not title resources with such general names as "Chapter IV," or "Introduction," or "Section Two," because they are not always displayed in the context of the folder in which they sit. Resource titles have to make sense on their own, without a parent folder to explain them.
Description (Required)
Include any facts you feel might help attorneys decide whether or not they wish to use it. The text you enter is part of the search record for the resource.
TIP: If no description is needed, you can repeat the title.
Document Type (Required)
This information is being captured to allow it to be used as a filter in a planned Advanced Search feature. In the future could be used to create a “By Document Type” view of the Library. We strongly recommend that you choose a type (and avoid "Other") so that when these features are developed, they accurately reflect your library content.
Creation Date (Required)
Defaults to the current date.
Note: It is best to change this to the actual date that the attachment was last updated/authored.
Review Date (Required)
You can use this field to sort the Admin Inbox by Review Date as part of a content management plan.
Note: It is best to review resources periodically to ensure their continued relevance and that they have not been superseded by newly added items.

Organization (Required)
Enter the name of the organization that wrote the resource. If no such attribution is appropriate, enter "None" or "N/A." This field has an auto-complete list of legal organizations that you can choose from if you prefer.
This organization is LSC funded
If you check this box, the Legal Services Corporation's logo will appear next to the library resource.
First Name
Enter the first name of the resource author. Not required. Will display on site page. Note: Try to be consistent across the library with who this field, and last name, refers to (i.e. to the poster or the actual resource author).
Last Name
Enter the last name of the resource author. Not required. Will display on site page.
Email Address
Enter the email address of the resource author. Not required. Will display on site page.

Folder Assignment
Select the folder in which to place the resource. To place the resource into multiple folders, hold down either the CTRL or SHIFT key to make multiple selections.
TIP: It is highly recommended that you do not place resources into multiple folders. This can confuse users and overpopulates the library. It is better to tag resources with multiple tags if they are applicable across different areas (see below).

File Attachments (Required)
Resources can be posted in the form of a “URL Link” to another website, as one or more “File”, or as an “HTML” file you create directly on the form. Select which type you're using by clicking the appropriate button. Only one of these may be attached to a resource. You cannot have a HTML, a File and a URL at the same time. Additionally, you cannot later switch file types after you save the form with your initial selection.
- "URL Link": Type in the full URL for this resource. You must include the appropriate prefix: http://; https://; or ftp://
- "Files": Click Browse to find a file in your system to upload. You can post up to five different forms of the same file: pdf, doc, rtf, xls, etc. However, you cannot post five different pdfs or Word documents.
- TIP: It is a best practice to post pdfs rather than Word documents to prevent possibly editing and for accessibility and readability.
- "HTML": In addition to uploading files from your computer, or entering a url, you may create an HTML file attachment. Select the Files button for this and create your attachment in the FCKeditor window. See Appendix A for tips on getting the best results from FCKeditor.
To remove an attachment, go to the Attachments section of the edit form and check the Delete? box beside the unwanted file. Then resubmit.
TIP: To transfer an existing HTML file into FCKeditor:
- Copy the source code from your document;
- Click the Source button tab at the bottom of the FCKeditor window;
- Paste the source code into the window;
- Click the Source button tab again to render the formatted text onscreen

Status
You must switch the status of the new resource to Approved if you want to see in your library. Otherwise it will stay in your Admin Inbox under Awaiting Approval.
- Deleted places the resource in the Admin Inbox under Deleted items.
- More Information Requested and Rejected are useful internally as a way to mark resources you're not ready to publish or want someone else to review. Selecting either of these puts the resource in your Admin Inbox under the same category.
Shared
To check the box next to "Share this content item with other probono.net sites" means you allow members in all practice and geographical areas to retrieve it in a search. Admins from other areas will also be able to add the resource to their practice area libraries. Member type privileges set by you still apply to shared content.
See Publishing Shared Content for more information.
Give Priority
This setting is not currently used in the Library tool.
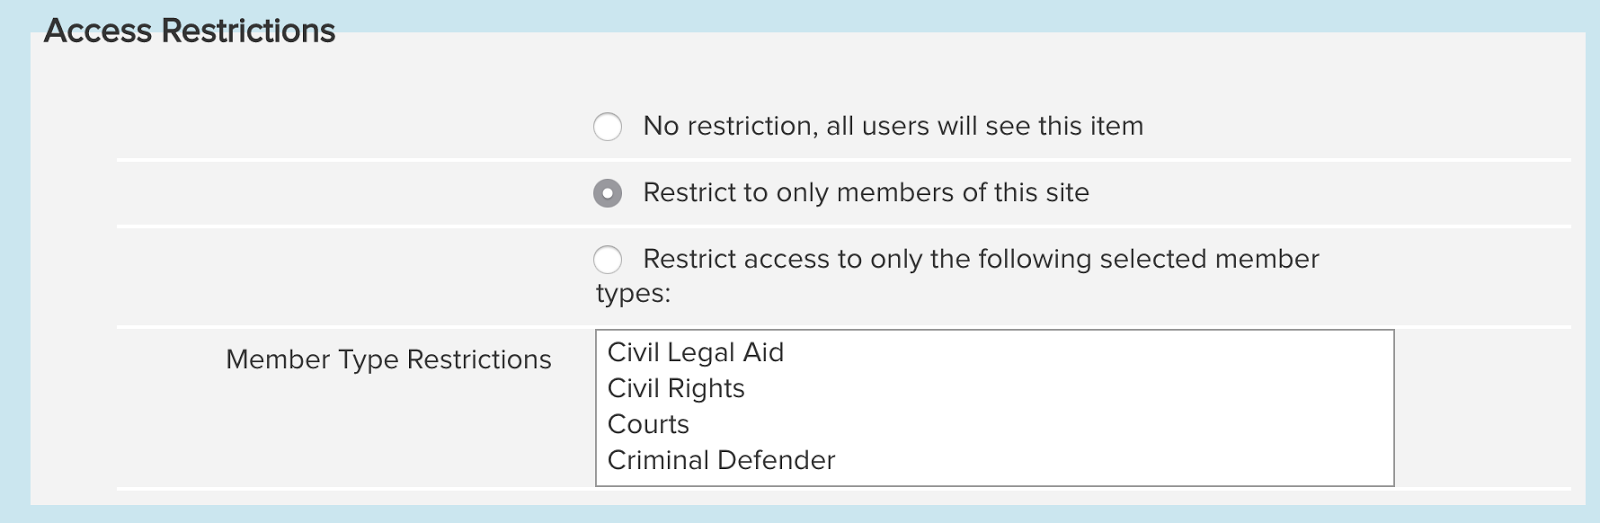
Access Restrictions
Select who will see a Library resource by choosing from the options listed. Be mindful of how you tag a resource with access permissions and how that designation plays out with the Library tool's access permissions. See below for more:
No Restriction
If your Library tool is password-protected--meaning only logged in site members can see its content-a resource marked No Restriction will still be hidden from public users because they will not be able to access the Library page in the first place.
TIP: Even if your library page is restricted to members, you may want to mark resources as "No Restriction" so that they can be shared and read by non-members in other library pages.
Restricted to Members of this Site
Only logged-in members of the site will see the item. Even if this item is published on a public Library page, it will only display to logged-in members.
Allow access by these members
Only the user type(s) you select from this list will see the event. To select more than one, hold down the CTRL key on your keyboard as you click.
Area topics (Required)
Library resources may be tagged at the Topic and Subtopic level. Take these steps to assign topics:
- Topic: Select a topic from the drop down list and either it will appear in the box below labeled Available Topics/Subtopics, or its Subtopic(s) will appear in that box.
- Available Topics/Subtopics: Highlight the topic or appropriate subtopic in this second box and click the down arrow below the box to move it down. Note how the item appears in the 3rd box labeled Assigned.
- Assigned: Whatever appears in this box is what you're choosing to tag your Library resource with. To remove an assigned topic, highlight it and either double-click, or hit the UP arrow above the box.
TIP: For resources that could be placed in multiple folders (i.e. a consumer debt resource that could be in the Consumer section and Foreclosure section), place the resource in the folder it is most relevant to and then tag it with all the other topics.
Click Submit to post the resource.
- TIP: If you do not see the item you just submitted it's more than likely that the Status was not set to Approved. Look for it in your Admin Inbox > Awaiting Approval > Library Item list. If your item is there, click its title to open it. Scroll down to the Status box. Choose Approved. Then click Submit.
Approving a User-Submitted Resource
Non-admin users are permitted (and encouraged) to submit library resources of their own. However, such items are not automatically published to the site; they appear in the Awaiting Approval section of your Admin Inbox until an Area Administrator reviews and approves them.
(See Admin Inbox chapter for more information about how the Admin Inbox works.)
To publish such a resource, go to your Admin Inbox. You'll already have all Awaiting Approval content displayed, so just click Library Item. Open the resource's FCKeditor content form by clicking on its title. Before approving, be sure to review or reformat the following:
- Description: (Note: Non-admin users do not have access to FCKeditor when submitting resources, but instead enter info in plain text.)
- Folder assignment
- Status
- Shared
- Give Priority
- Access Restrictions
- Topic(s)
To publish the resource, switch its status to "Approved" and click Submit at the bottom of the page. Or, elect any other status option you want.
NOTE: The name and email address of content submitters displays at the bottom of each form. If you have any questions about the item, click on the email address to send a query.
NOTE: For Library resources that contain an attachment, it is necessary to approve the resource first in order to view the actual attachment. If, upon viewing the attachments, you want to remove one or more, click the edit buttonand check the Delete box beside the unwanted file in the Attachment section.
TIP: If the item submitted includes a link to another web site, copy and paste its URL into a new browser window to check the link.
How to Share-In Library Resources From Other Sites
Please click here for details about this tool's content sharing abilities.
The Shared Content Tool is a great way to add additional library resources from other sites to your site, if the content has been shared. You can access this tool from the Admin Inbox, under "Shared Content" in the drop-down menu and by clicking on the magnifying glass icon.

Next, select "Library Item" and you will see a list of library items that have been shared-in from other Pro Bono Net sites.
This tool provides information on a resource's title, submission date, review date, folder name, PBN site source, topic(s), associations, restrictions and attachment types where applicable.
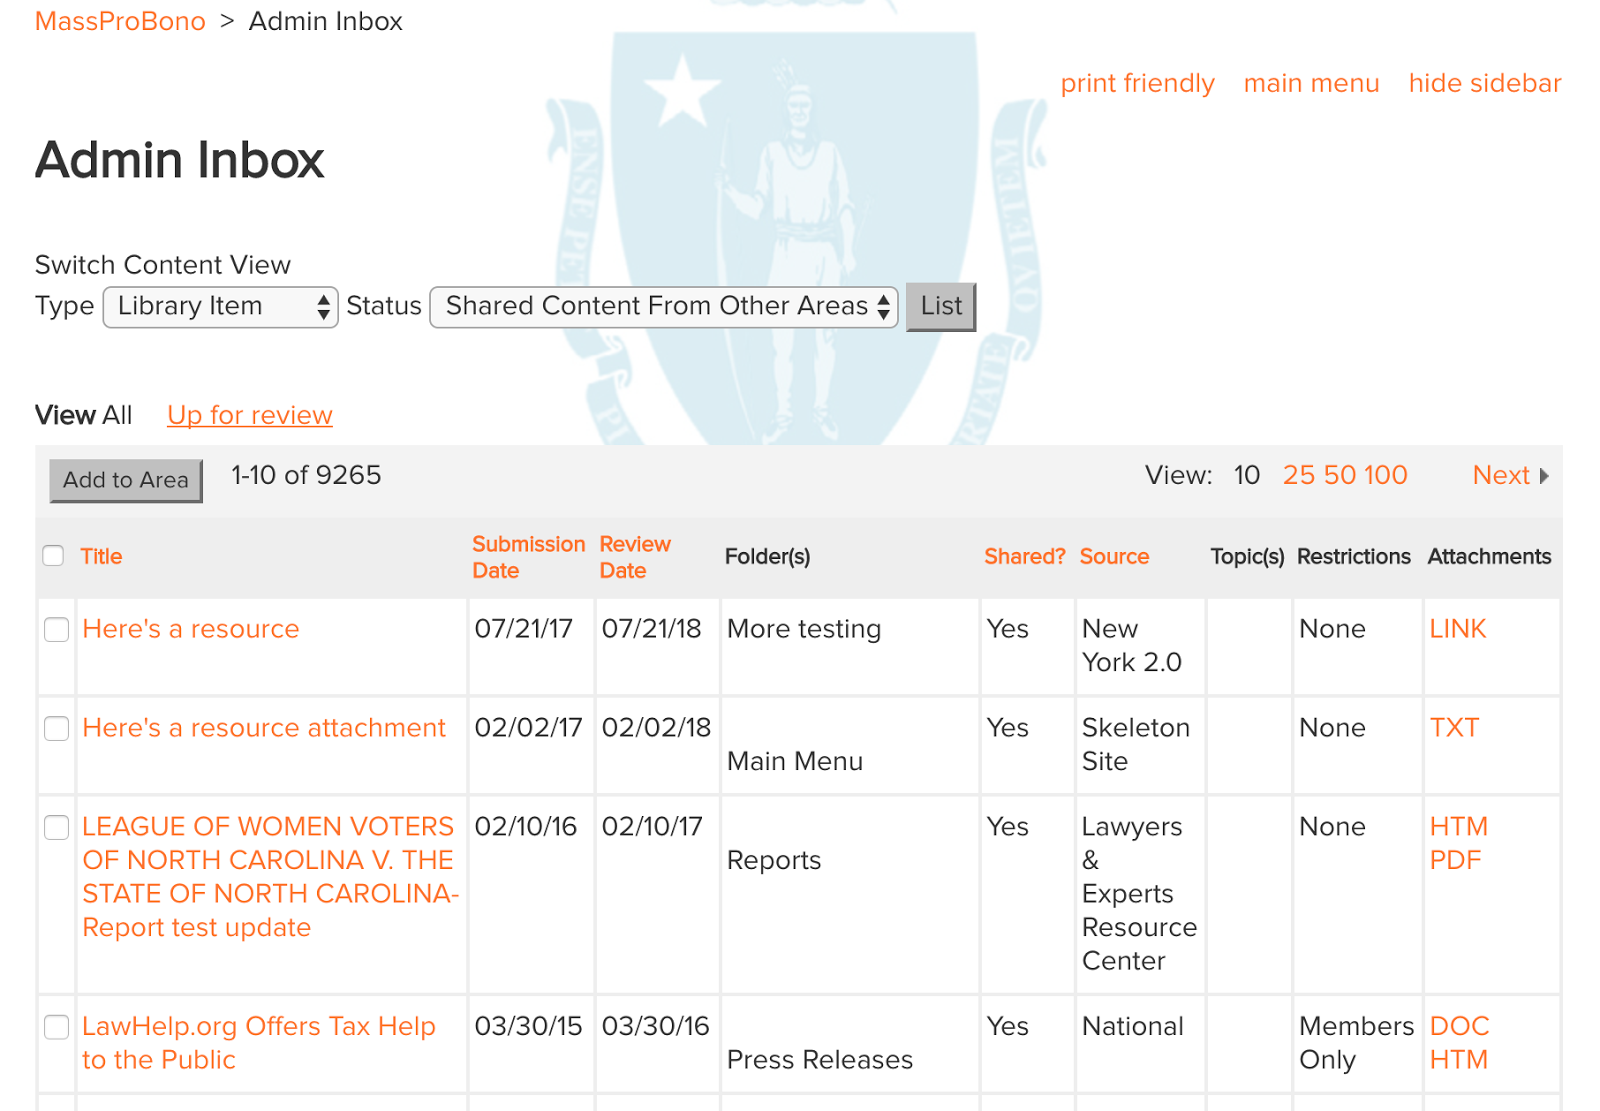
Library items can be filtered chronologically by date clicking on the "Submission Date" or "Review Date" text. Calendar events can also be filtered alphabetically by title and source by clicking on the appropriate text.
TIP: To view many items at once and reduce the amount of pages you need to load, do the following:
- click on "View: 25"
- The URL of the page will now be something such as: http://www.probono.net/ny/nyc/admininbox/content-list?ct=4&ac=0&mr=25&sr=1
- Change the 25 in "mr=25" to however many resources you want to see on one page and load the new page. Do not search for over 1000 items as the search will timeout.
To approve a library item to your site's own library, click on the title of the resource and update the status to "Approved." Assign topics as necessary and click on "Submit." The Shared Content will appear in your site's Library Tool. If the resource is deleted or edited by the site that originally shared the calendar content, the content will be automatically updated on other sites it has been shared into.
For more details, be sure to refer to the Publishing Shared Content section in this manual.
TIP: Another way to filter is to utilize the Shared Inbox Search Filters. You can access this through the Admin Inbox, by clicking on "Shared Content" in the drop down menu.
.png)
Then, click on the "Shared Inbox Search Filters."
.png)
Select or deselect filters for shared content from other sites as necessary.
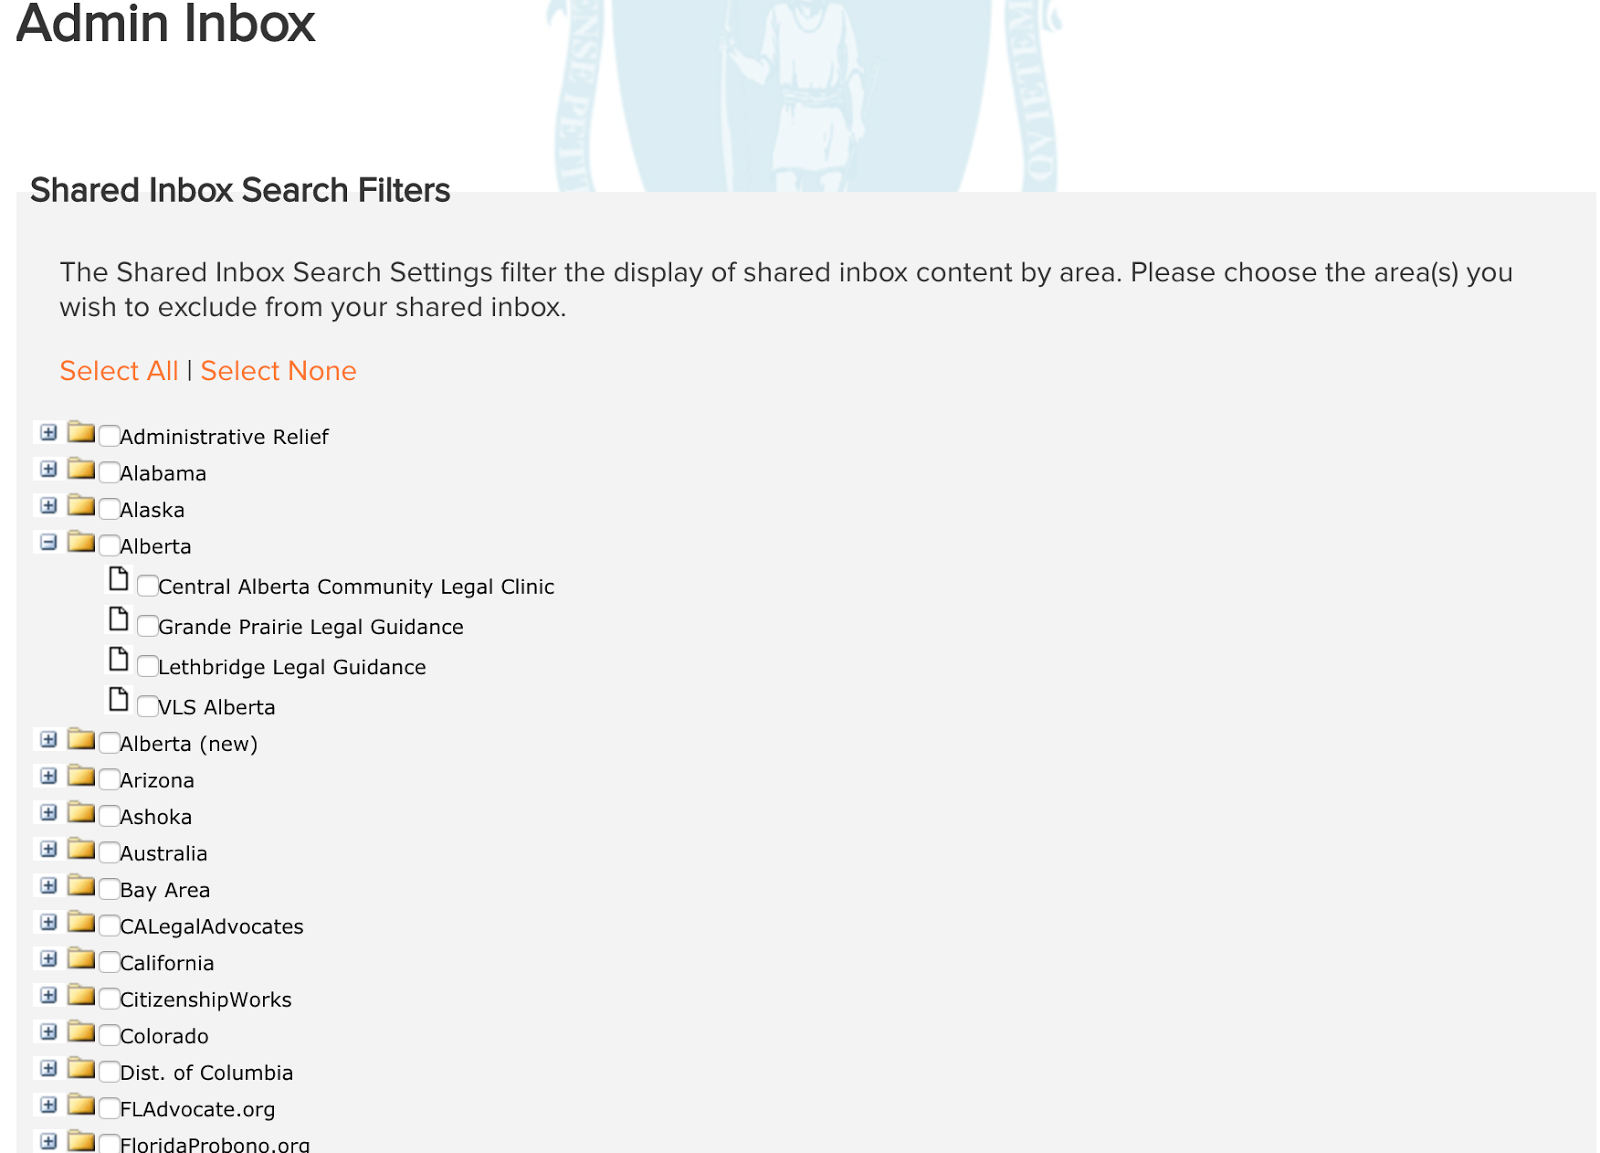
Check boxes next to a site name indicate that the particular site will be excluded from sharing-in content to your site. Clicking on the plus symbol next to a site name will display its practice areas, which can also be selected or deselected as necessary. Click "Finished" to save changes. Please note that these settings are user specific.