Calendar Tool
The Calendar Tool allows administrators to share events with their users. This resource is broken down into the following sections.
- How to Post a Calendar Event
- How to Share-In Calendar Content From Other Sites
- Calendar Form Fields
- Updating or Deleting a Calendar Event
- Approving a User-Submitted Event
- Guidelines for Formatting Calendar Event Content
- Content Sharing
- RSS Feeds from Calendar Events
- Embeddable Widget Generator
Calendar Tool Overview
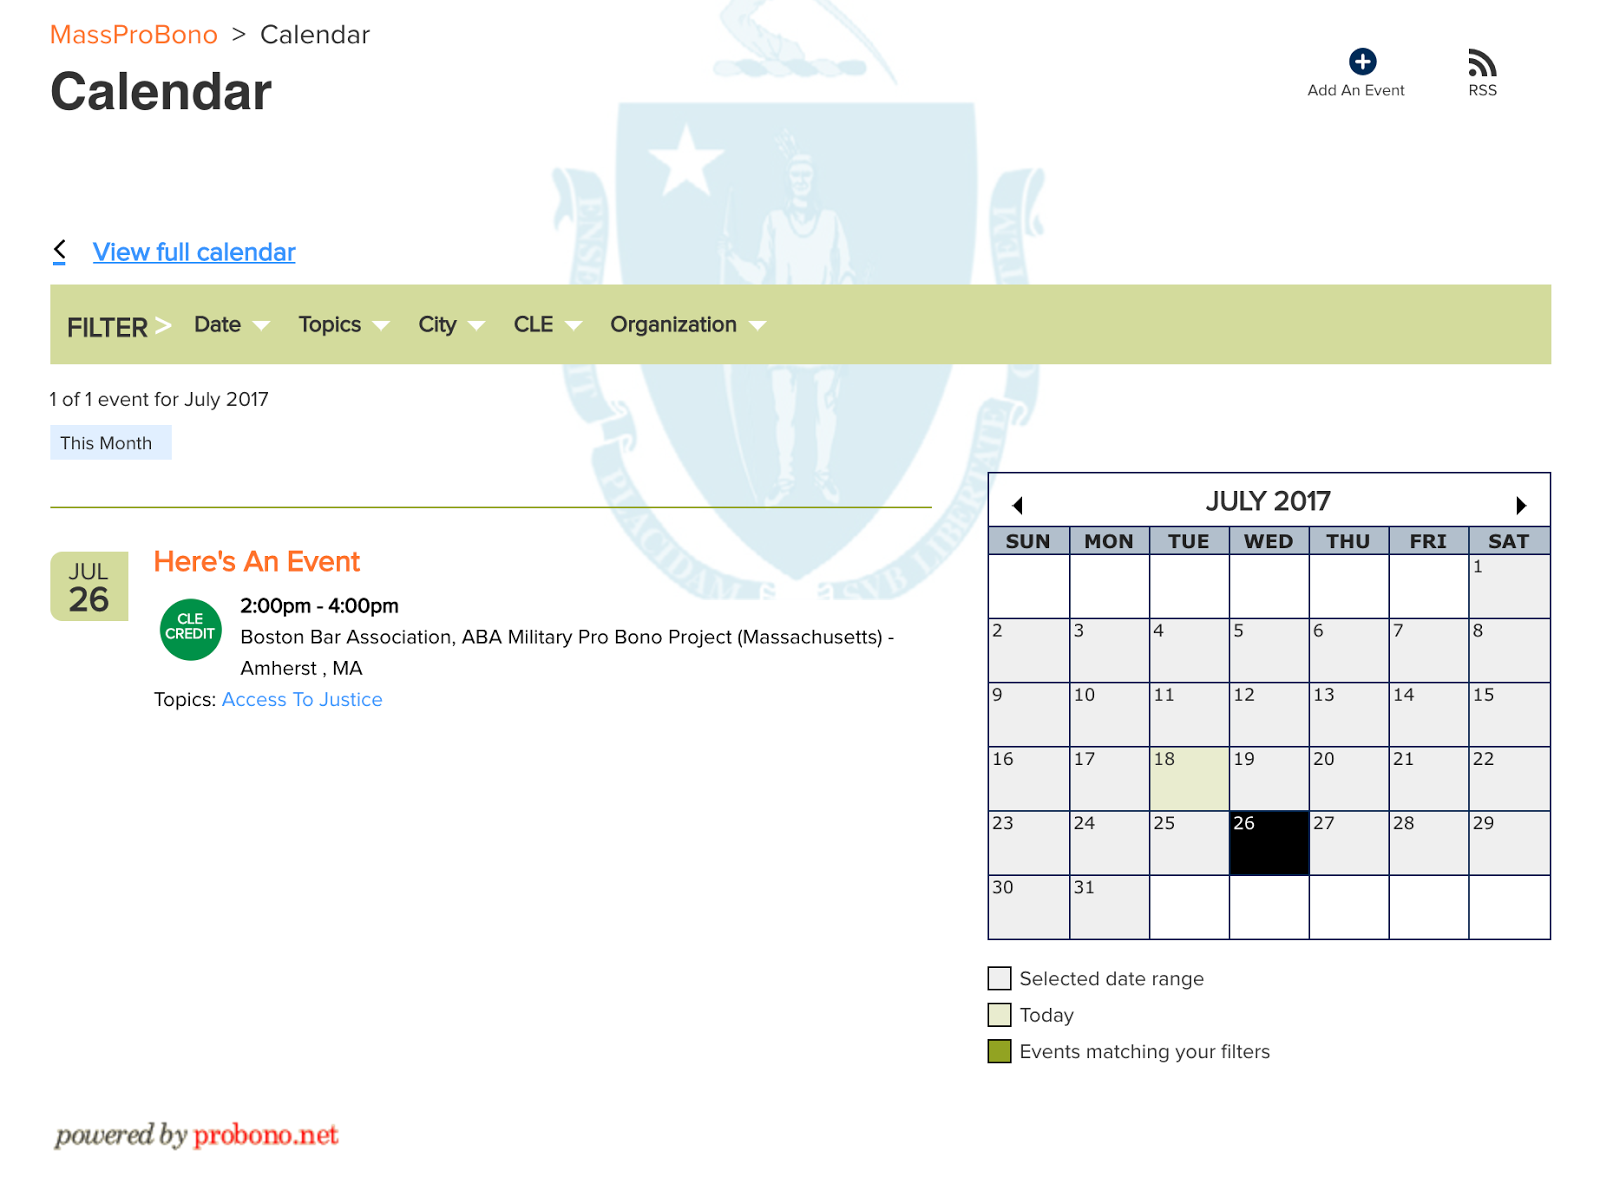
This is the general view of the calendar tool from a desktop, where you can access relevant events and select filters to focus your search as needed at the bar on the top. From here you may also add events.

This is the mobile view of the site.
How to Post a Calendar Event
Click the “Add an Event” link at the top right of any Calendar page to open the “Create Event” form. Then, fill out all the required fields, which are the fields marked with asterisks. If you leave a required field empty, the form will not submit, and the system will you prompt you at the top of the page to fill in the fields.

TIP: When prompted at the top of the page to correct any issues, you can click on the field title listed to be moved directly to the missing field in the actual form.
Calendar Form Fields

General Information:
Title (Required)
The title of the event is what users will click on to access more information about the event.
Description (Required)
This will appear on the Detail view page. It is a FCKeditor field.
Start Date/End Date
This is the date of the event, and the end date is set automatically to match the start date.
Start Time/End Time
Enter the start and end time of the event in this field if known. You can leave the minute field blank if the event begins or ends on the hour. The end time is set to automatically match the entered start time, but you can change it to match your event’s time.
Location:

City
If your calendar sorts geographically by City, make sure to enter city names consistently; otherwise you will end up with multiple variations on the same location displaying (e.g., New York, New York City, NYC).
Sponsoring Organization(s):

Enter the name of the sponsoring organization(s) into the available fields.
Select the checkbox for “At least one of these organizations is LSC funded if that holds true. If one or more of the Sponsoring Organizations is funded by LSC, the LSC logo will display next to the event title.
Related Project or Case (if Applicable)
If you have associated a project or case with an event on those respective forms, you will be able to link those activities with a calendar event. When this happens, links to the project or case will appear on the calendar item and vice versa.
Contact Information:

Phone Number
Enter a phone number of up to 20 characters.
Email Address
This field will convert to a hyperlink on the site. If you have multiple email contacts, enter them in the description field.
Website
Enter a full url, including the http:// prefix.
Registration URL
Enter a full url, including the http:// prefix.
Webcast URL
Enter a full url, including the http:// prefix.
Related Case or Project (If Applicable)
If you have created a related case or project, you may associate the calendar event with that case or project. A notation that there is a calendar item associated with that project or case will appear on the project or case listing and vice versa.
Subevents/Registrations
This gives you the ability to create a subevent and registration after creating a parent event. If creating a subevent, a notation that there is a subevent associated with that parent event will appear on the subevent details page and vice versa.
If creating a subevent, you must then enter in event details for the subevent. This gives you the opportunity to:
- set a participant limit
- enable event registration functionality
- When event registration is enabled, members can sign-up for an event, and admins can view the event registration list.
- When event registration is enabled, members can sign-up for an event, and admins can view the event registration list.
Attachment(s):
You can upload a registration form, flyer or webcast from your computer. First click “choose file”, then, look for the file you would like to attach. Select the file, and select the option “open”, and it will upload onto the form.
NOTE: You can only upload one attachment per event-you cannot have a webcast, and a File at the same time.
TIP: If you make a mistake and upload something you don't want, select the None radio button to discard it, OR click Browse to overwrite what's there with a replacement from your computer.
Settings:
.png)
Status
The default status is Awaiting Approval, which means that if you don't change this to Approved, you will not see the event in the Calendar, and it will remain in your Admin Inbox. Switch the status to Approved if you want to publish the event to your Calendar page immediately.
“Deleted” places the event in the Admin Inbox under Deleted items.
“More Information Requested” and “Rejected” are useful internally as a way to mark items you're not ready to publish, or want someone else to review.
Access Restrictions:

Select who will see a Calendar event by choosing from the options listed.
No Restriction, All Users Will See this Item
Any use will be able to access the calendar event.
However, keep in mind the following:
If your Calendar tool is password-protected--meaning only logged in site members can see its content--a No Restriction event will be hidden from public users because they will not be able to access the Calendar page in the first place.
Consider marking Calendar events as No Restriction and selecting the Share this item box. This allows them to be read by the public in other, open Calendar pages (e.g., the Geo Area Calendar page), and frees them up to be returned in search results.
Restricted to Only Members of this Site
All logged-in members of the site will see the item. Even if this item is published on a public Calendar page it will only display to logged-in members.
Restrict to Only the Following Selected Member Types:
Only the user type(s) you select from this list will see the event. To select more than one, hold down the CTRL key on your keyboard as you click.
Shared:
Selecting the box next to "Share this content item with other probono.net sites" means you allow members in all practice and geographical areas to retrieve it in a search. Admins from other areas will also be able to add the event to their practice area calendars, but keep in mind that the member type privileges set by you will still apply to shared content.
See Publishing Shared Content for more information.
Give Priority:
This field is used to assign events for inclusion into the monthly training calendar. It does not affect display on the calendar page.
Area Topics:

Calendar events may be tagged at the top Topic level only.
NOTE: All content, from library materials to calendar events to news stories, must be tagged with one or more Topics.
To assign Topics, take these steps:
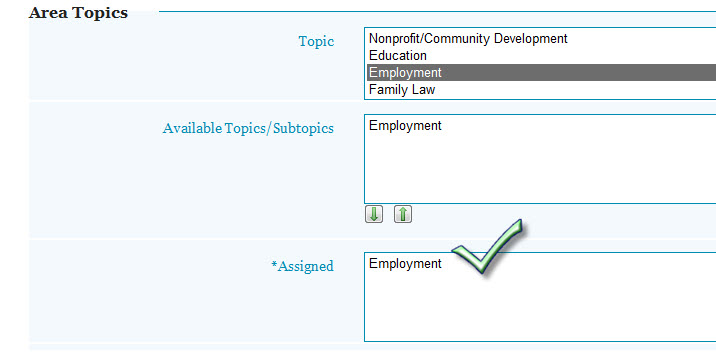
- Topic: Select a topic from the drop down list and it will appear in the box below labeled Available Topics/Subtopics. (Calendar events do not have Subtopics available for tagging; this is for Library items only.)
- Available Topics/Subtopics: Double-click the topic in this second box OR select it and hit the down arrow below the box. The item will appear in the 3rd box labeled Assigned.
- Assigned: Whatever appears in this box is what you're choosing to tag your Calendar event with. To remove an assigned topic, highlight it and either double-click, or hit the UP arrow above the box.
Click Submit to post the event and you will automatically return to the Calendar page.
TIP: If you do not see the item you just posted, most likely, its “Status” was not set to Approved. Look in your Admin Inbox > Awaiting Approval > Calendar list. If the item is there, click its title to open it, then, scroll down to the Status box, and choose “Approved”, before clicking “Submit” again.
Updating or Deleting a Calendar Event
To delete or make changes to an existing event, click on the event title to open the form, and then click the edit icon next to its title. Make your changes, then click the Submit button at the bottom of the screen. If you wish to delete the event, change its status to “Deleted”, and click Submit. (The event will disappear from the Calendar's live pages, but it will remain in the system's Admin Inbox under Deleted Items.)
NOTE: If the event was shared in from another area, the fields you may edit are limited to Status, Priority box, and Area Topics. In addition, you can click the Settings tab to send the event to one or more areas' Admin Inboxes for possible publication. See Publishing Shared Content for more information on Shared Content.
NOTE: Deleting a parent event will also delete the subevent.
Approving a User-Submitted Event
Non-admin users are permitted (and encouraged) to submit Calendar events of their own. However, the events they submit are not automatically published to the site, and instead they appear in the "Awaiting Approval" section of your Admin Inbox. Those events will remain there until an Area Administrator reviews and approves it. (See Admin Inbox chapter for more information about how the Admin Inbox works.)
To publish a user-submitted event, go to your Admin Inbox, under the “Awaiting Approval” will be a list of all relevant content.
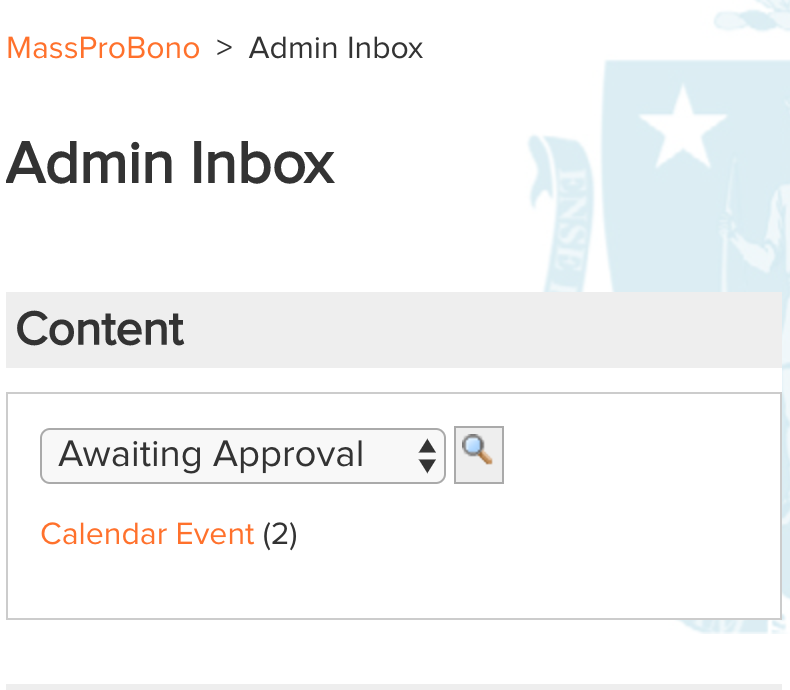
From there, click “Calendar Event” and you will be directed to a page with all the events awaiting approval.

Open the event's content form by clicking on its title, then change its status to “approved”. However, before clicking “submit” make sure to review and reformat, as needed, the following:
- Description
- Non-admin users do not have access to CKEditor when submitting events, but instead enter info in plain text.
- Status
- Shared
- Mark Priority
- Access Restrictions
- Topic(s)
Now switch its status to "Approved" and click Submit at the bottom of the page. Or, elect any other status option you want.
NOTE: The name and email address of content submitters displays at the bottom of each form. If you have any questions about the event, click on the email address to send a query.
NOTE: For Calendar items that contain an attachment, it is necessary to approve the event first in order to view the actual attachment. If, upon viewing the attachments, you want to remove one or more, click on the Edit button and select the Delete box beside the unwanted file in the Attachment section.
Guidelines for Formatting Calendar Event Content
- Watch out for typos!
- Make sure to curb the AMOUNT OF ALL CAPS THAT ARE USED.
- Extra Tip: Copy and paste ALLS CAPS TEXT into MS Word. Highlight the text. Hit Shift+F3. This will make everything lowercase. Hit Shift+F3 again. This will capitalize the first letter of every word. Clean up the capitalization as needed
.jpg)
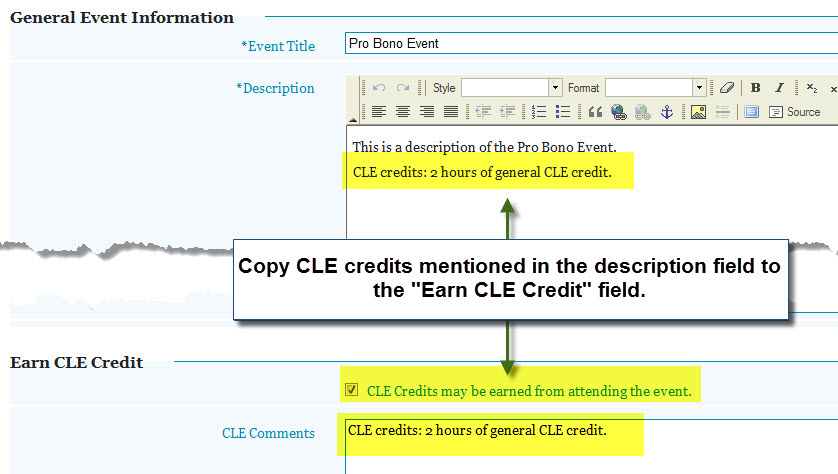
- Make sure that any CLE details in the description are also in the "CLE Comments" section.
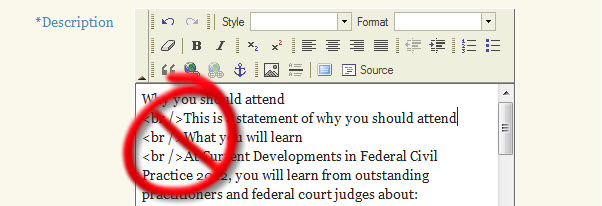
- Make sure that the description field does not contain HTML tags. To easily get rid of such formatting, simply copy and cut the text, then click the "Source" button in the editor and paste. Hit the "Source" button one more time, and this will adjust the HTML formatting. You may have to re-format spacing and bold text again.
- If the event submitted includes a link to another web site, copy and paste its URL into a new browser window to check that the link is functional.
- Check for consistency with the way your calendars are labelled i.e. all New York City events as "New York City" or "NYC" not "New York City" at times and "NYC" at other, also check for words such as "Street" (vs St) and "Avenue" (vs Ave).
- Include commas after the "Location Name" field, "Address Line One" field and "Address Line Two" field, if fields have data entered in them. This will ensure that the address line displays properly in the the public view of the calendar and in the calendar mailing. Please note that the "Location Name" is not generated by the e-calendar mailing, only the address information.

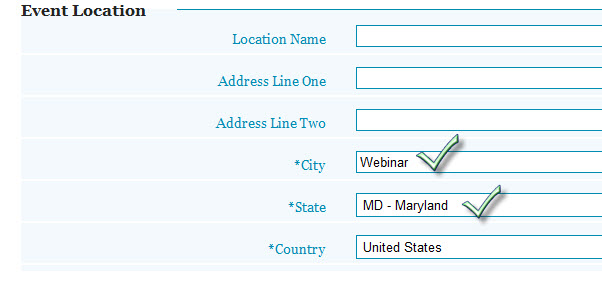
- For webinars, write in "Webinar" in the location box, and set the state location to your state. However, if the information is shared in, you will NOT be able to update the time zone to reflect that of your state. Pro Bono Net staff will make sure the time zone information is reflected accurately in the mailing for events that have been shared into the calendar.
- Avoid commas in the "Sponsoring Organization(s)" fields. This will ensure that the address line displays properly in the the public view of the calendar and in the calendar mailing.

- If your calendar mailing is sent from a geographical website area, events in your local practice areas must first be shared into your geo area calendar. Otherwise, calendar events in your practice area will NOT appear in your calendar mailing.
- Events must have "Give Priority?" set to "Yes". If events are not marked Priority they will not be included in the email.

- Events should have member type restriction set to "No Restriction."

- Make sure to code event topics correctly.
- Only assign one topic to a calendar event.
- Do NOT APPROVE calendar mailings in your inbox. Pro Bono Net staff will handle this step when the e-calendar mailing is ready.
.jpg)
How to Share-In Calendar Content From Other Sites
Please click here to for details about this tool's content sharing abilities.
Take advantage of the Shared Content tool if you find that your site's calendar does not have enough content for the month. You can access this tool from the Admin Inbox. First select "Shared Content" in the drop-down menu and then click on the magnifying glass icon on the right.

Next, select "Calendar Event".

Then, you will see a list of the calendar events that have been shared-in from other Pro Bono Net sites. This tool provides the event's title, city, start date, Source topic(s), Org(s), and restrictions when applicable.

Calendar events can be filtered chronologically by start date clicking on the "Start Date" label. Calendar events can also be filtered alphabetically by title, city and source by clicking on the appropriate label. To approve a calendar event to your site's calendar, click on the title of the event and update the status to "Approved." Assign topics as necessary and click "Submit." The Shared Content will appear on your site's calendar. If the event is deleted or edited by the site that originally shared the calendar content, the calendar content will be automatically updated on all the sites it has been shared into.
For more details, be sure to refer to the Publishing Shared Content section in this manual.
TIP: Calendar events that may be useful to share-in are relevant webinars and other appropriate events that are located in-state or close by. Clicking on "City" will help sort locations by alphabetical order; webinars should be listed under "Webinar."
To filter through the events you may also utilize the Shared Inbox Search Filters. You can also access this through the Admin Inbox, by clicking on "Shared Content" in the drop down menu. Then, click on "Shared Inbox Search Filters." From there, you can select, or deselect, filters as needed. Checking the box next to a site name means that particular site will be excluded from sharing-in content to your site.
 Clicking on the plus symbol next to a site name will display its practice areas, which can also be selected or deselected as necessary.
![]()

Click "Finished" to save changes. Please note that these settings are user specific.
RSS Feeds from Calendar Events
Clicking on the RSS feed icon will open up a new page. Grab the URL of that page and distribute it as needed to other sites or tools that can consume RSS. This will allow a user to view News published to a probono.net site automatically pulled into another tool or site.
Embeddable Widget Generator
The calendar and new cases embeddable widget generator allows a site user to generate a widget that dynamically (automatically) pulls calendar or new cases tool information from your probono.net site, and can be embedded on an external site.
The widgets allow partners and supporters to easily display a list of upcoming volunteer trainings or available cases on their own website, blog, or intranet. As trainings and cases are added to your probono.net site, the updates are reflected in real-time in the widgets embedded on an external website.
Admins can email support@probono.net to enable this functionality on either their calendar tool or new cases tool.
Accessing the Embeddable Widget Generator
Site users can access the tool by navigating to the calendar or new cases tools. In the upper right corner, they will see a “get our widget” link. When users click this link, they will be able to configure the widget for their site.
Settings – In this section users can title the embeddable widget, assign the number of events it displays, and select what state and topics the widget pulls data from. Users can also determine whether to pull in city data.

Dimensions – Here users can select the widget width and height.

Global Settings – Here admins can adjust the footer message of the widget, add an icon, or select viewer restrictions for the widget.

Admins can also configure default widget settings for embeddable widget.
There is an option to preview your widget before grabbing the embed code for placement on an external site. A preview can be seen on the right hand side of the screen.
