Admin Inbox
- Managing Content
- Site Reports
- Area Utilities
The Admin Inbox serves as a central administrative hub for all of the content on your site. User-submitted content can be reviewed and approved. Admins can also search for content across all area tools, as well as search shared content from other websites on the probono.net platform. The Admin Inbox also contains several utilities, including usage reports
The Admin Inbox is accessed through the Admin Tool Tray. The Admin Tool Tray contains a list of links that are only viewable when logged into your website as an administrator.
All content in the Admin Inbox exists in one of seven statuses:
- Awaiting Approval
- Approved
- Deleted
- More Info Requested
- Rejected
- Sent
- Shared Content from Other Areas
- TIP: We strongly recommend that you visit your Admin Inbox regularly to check for Awaiting Approval content. Not only is this where applications to join your site reside, it's also where content submitted by the public and by your practice area members resides. All such content requires admin review and approval before it posts live to the site. Calendar events and News articles are especially date sensitive.
For each Status, as illustrated in the screen shot below, your site's content is sorted according to the tool it is associated with.
.jpg)
The number beside each tool indicates the number of individual pieces of content posted on that page. As illustrated above in the Awaiting Approval status, the Admin Inbox gives you a bird's eye view of everything that awaits your review.
To review content in another status (Approved, Deleted, etc.), simply choose that value in the Status dropdown menu and click the magnifying glass icon to switch.
- TIP: To review your site's live content, remember to swith the Status to Approved.
Managing Content:
1. How to View Each Tool's Content in the Admin Inbox
Click the tool whose content you wish to view. A page loads with that tool's content displayed in alphabetical order. Note the status of that tool's content--if you want to switch it, use the Status drop down list and then click the List button.
A "record set" refers to all the content in the Status and Tool type you have selected. See screen shot below of the record set for Approved content on the Calendar tool:

Each tool in the Admin Inbox has its own column headings, so they will differ from tool to tool. However, common among all tools are filters that allow you to control the record set you've called up:
Type
Allows you to switch among tools, e.g., from Library to Calendar to New Cases, etc.
Status
Allows you to switch among content that is Approved, Awaiting Approval, Deleted, etc. Make sure to click the List button after you choose a different Status.
View (left side of page)
Allows you to filter the displayed records by certain key variables. The default filter value is All, and options vary by tool. For example:
- Calendar: All, or click Current for all events from the current date forward, or click Past for events prior to the current date.
- News and New Cases: All, or click Current to see current items or Expired for those whose expiration date has passed.
- Library Item: All, or Up for Review to view resources that have passed their review date.
- Members: All, or click Administrators to limit the record set to Admin members only.
Allows you to modify the number of records per page: 10, 25, 50 or 100 records per page. Default is 10 records per screen.
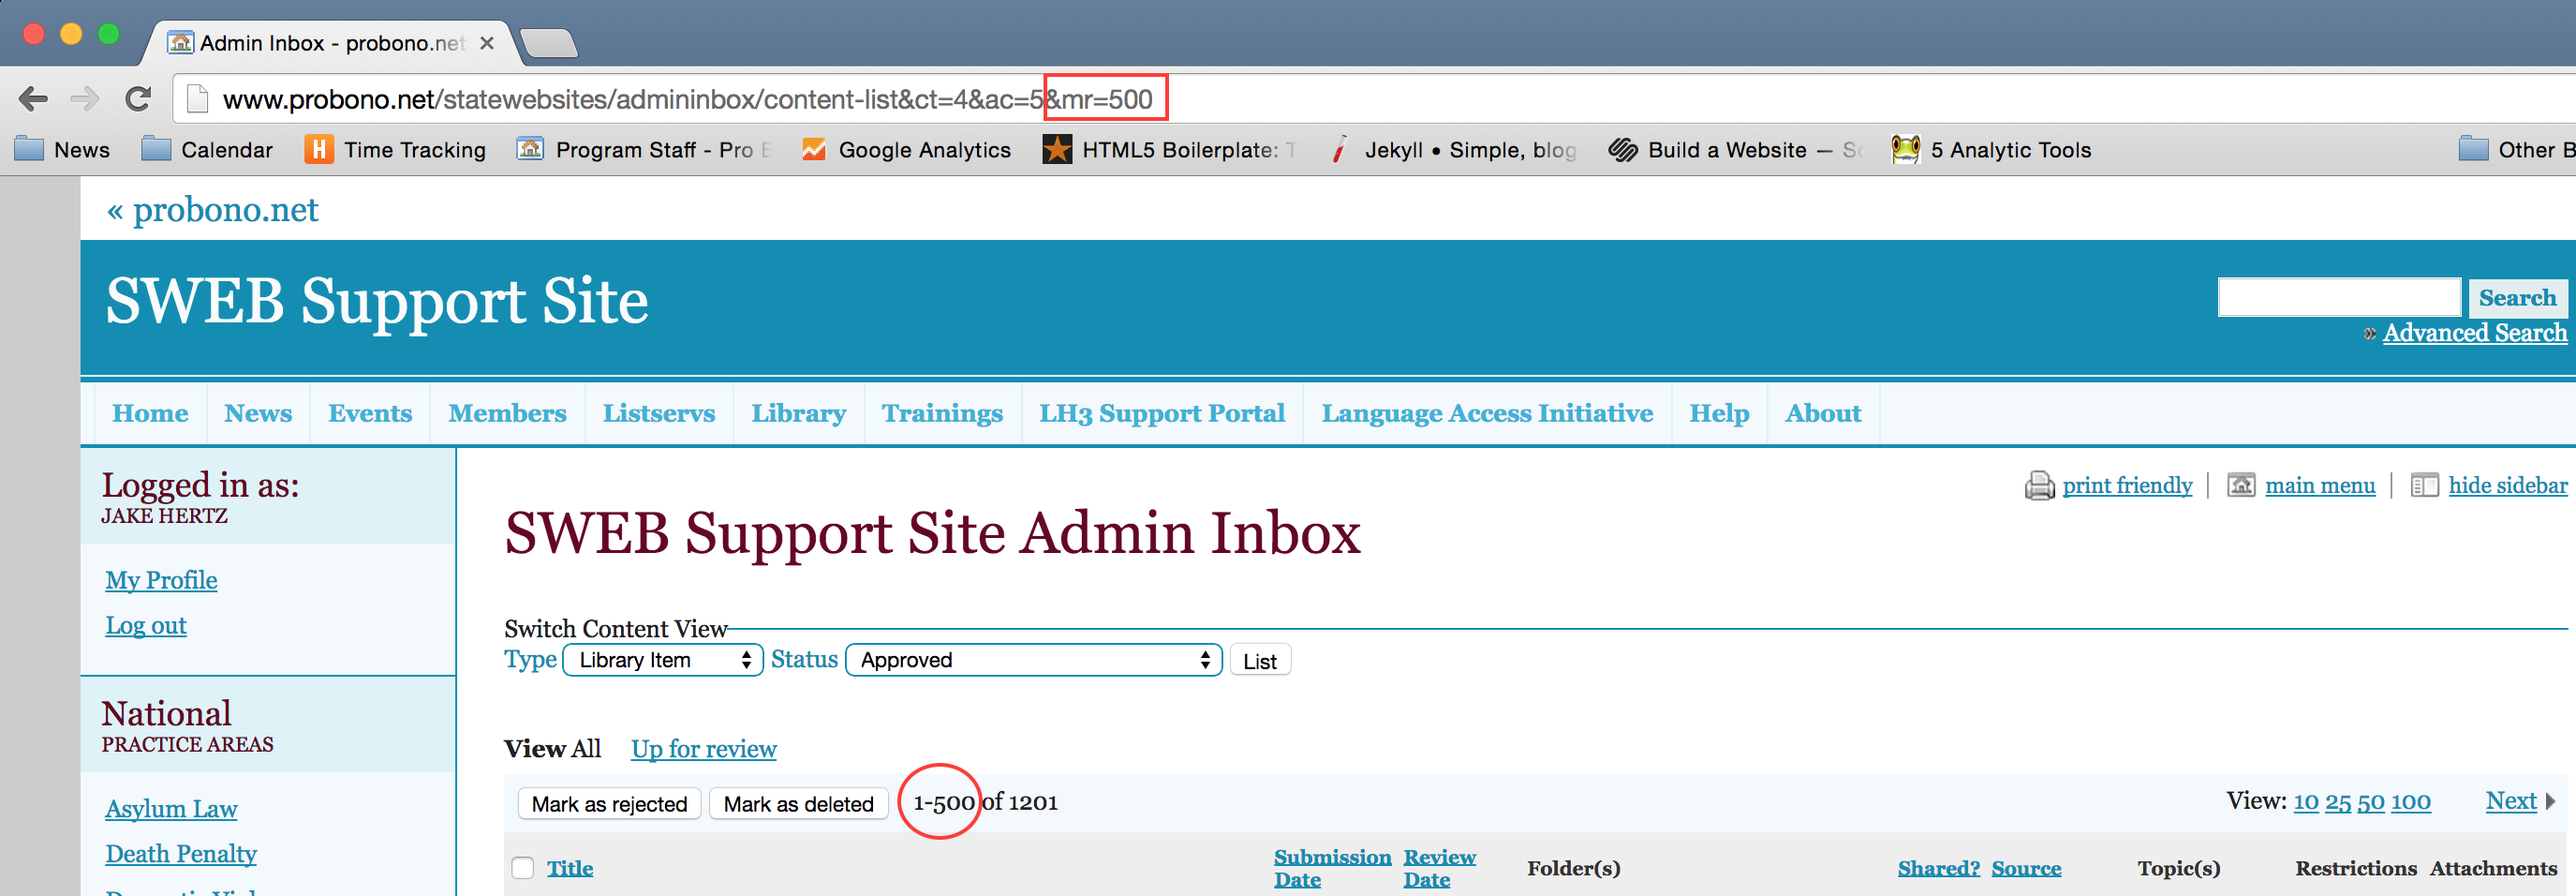
- TIP: The system displays where in the record set you are. For example, when viewing Library resources, it might indicate you are viewing 1-10 of 606 Resource(s), 21-30 of 606 Resource(s), etc.
- TIP: You can customize the number of records displayed, by appending "&mr=###" to the end of the URL with ### being the number of records you wish to view. For example, if you wanted to view 500 records, you would add "&mr=500" to the end of the URL (see picture below). We recommend a maximum of 1,000 records per page to avoid server issues.
2. How to Sort Content
The default display for record sets in your admin inbox is alphabetical order by document title. However, you may also click the blue column headings to rearrange the items on display. Click a column heading once to sort the set in ascending orderand click again to re-sort in reverse order.
The screeshot below shows Approved Calendar events, which just above, we see sorted in alphabetical order according to their titles, now sorted in ascending order by their Start Date, so the earliest events are at the top:

- NOTE: Depending on which tool's content you're viewing, slightly different column headings will display.
Here is a brief explanation of column headings that may not be self-evident:
Shared
Whether the item is marked as shared.
Source
The Practice Area that is the original poster of the item.
Exp Date
The date a News item is set to expire
Authoring Org
The organization(s) sponsoring or authoring a News item.
Restrictions
Any member type restrictions that apply to the item, e.g., which member types may view it
- NOTE: The sort order you select with column headings does not carry over when switching your view to a different record set. The new record set will default to alpha order by document title.
Tips for Sorting the Admin Inbox
Library
To view the most recently posted library content, make sure that the Type box is set to Library Item and that the Status box is set to Approved and. Then click the blue column heading Submission Date TWICE to arrange the set in reverse date order (most recent first). To see your oldest records, click the Submission Date once.
Members
To see Roster members arranged by member type, set the Type box to Members and the Status box to Approved. Then click the column heading Member Type.
To view Roster members approved on a specific date, set the Type box to Members and the Status box to Approved. Click the column heading Date Approved to rearrange the set in chronological order of when members joined.
Remove in Bulk
You can use the sorting functions in the Admin Inbox to quickly sort approved content and remove it in bulk. Once you've selected the content type, sort it using any of the filters discussed above and then select the content you wish to delete. Use the "Mark as deleted" or "Mark as rejected" buttons to remove the content from your site.
- TIP: Use the custom view URL tip mentioned above to quickly view and manage large quantities of content from one page.

Shared Content from Other Pro Bono Net Areas
To view ALL shared content in the PBN system available for publication on your site, start on the very first page of the Admin Inbox--the one you get before you've selected a tool type or a status. Click the Content drop down box, and select Shared Content and the magnifying glass icon. See screen shot below:

You'll get a page with each tool's available shared content, plus a way to configure your shared content settings. See screen shot below:
.jpg)
Now click the tool whose shared content you're interested in. Click the blue column headings to sort the content -- see How to Sort Records in the Admin Inbox section above for more on sorting.
- TIP: As a Geo admin, you may want to upload calendar events from local or national practice areas into your Geo Calendar. To do so, sort the calendar record set by the Location column heading. This will allow you to focus in on those events that occur near or in your city or state.
3. Edit Content from the Admin Inbox
Click the title of the item you wish to edit. The FCKEdit form for that document (or join form in the case of membership applications) will open, allowing you to make necessary changes.
Click Submit at the bottom of the form to post your changes.
- TIP: Each time an admin modifies a piece of content, his/her email address will display at the bottom of the admin form along with the date the changes were made.
Have questions about updating labels on your site? Contact us for more details on using the label change fucntionality for Admin Forms.
Shared Inbox Search Settings
In the screen shot above, note the first link in the list, Shared Inbox Search Settings. Click this and you'll find a way to configure your shared search settings. This feature gives you a page listing all Geo PBN sites, each with a check box and a +/- (expand/contract) icon beside it. See screen shot below:

To reveal the practice areas within a Geo, click the + sign beside it. The checkboxes are meant to EXCLUDE areas from your shared content search. In other words, if Alabama is checked, then no content originating from that site will arrive in your Admin Inbox. After you make your selections, you must sign out and back in of your account for the changes to apply.
- TIP: You must check both the Geo AND its PAs if you want to exclude them all from your shared content. If you only check Alabama and not Civil Law, you'll be eligible to receive shared content from Alabama's Civil Law PA.
- NOTE: Search criteria do not automatically reset after a search. If you do not want to save your search preferences, you must manually reset them.
Adding Shared Content from Other Sites
See the Publishing Shared Content in your Area chapter for a more detailed explanation of this feature. Meanwhile, here's a quick walk through of how to add a shared item to your site's library, calendar, etc.:
Find shared content via the Admin Inbox or via a search. Click the title of the item you want to share to open its FCKEditor form (from a search click the pencil and pad cog), scroll down to the Settings and Other Areas tabs, and follow one of two courses:
- To share the item directly into the practice area you're currently in, stay on the Settings tab. change the Status to Approved and choose your practice area topics to tag it with. Then click Submit. The content will be live on your site.
- To share the item with practice areas either in addition to or other than the one you're currently on, you approve and tag it with topics using the Settings tab, and instead of clicking Submit, click the Other Areas tab--see screen shot below:

Click the practice areas you want from the list, holding down the Control (Ctrl) or Apple key while you clck to tag multiple areas.
- NOTE: When you send content to another practice area, it will go to the area's Admin Inbox--to be approved for publication at the discretion of that area's admin(s).
- NOTE: Please note that content types that can be shared are library resources, news, calendar and cases.
Click Submit. You will be returned to the record set. If the practice areas you shared into are ones under your administration, remember to go to their Admin Inboxes, pull up Awaiting Approval items and set the one you've just added to Approved to make it live.
Site Reports
Website usage reports are run during off-peak hours and published into your admin inbox on regular basis. See screen shot below:

The automated schedule of site reports runs as follows:
- Monthly [runs at 1:00 a.m. on the 1st of the month]
- Quarterly [runs every 3 months]
- Year-to-Date (updated monthly)
A more detailed explanation of this feature appears in the Reports chapter of this manual.
Links to the ten latest reports appear in your Admin Inbox. Click the View All link to see all of your site's reports. Click Create New to create a new one. The other blue clickable links in Site Reports work in the following way:
Title
Click on the title to open the report.
File
Click on the TXT link to download a copy of the report. This is a tab delineated text file. You can copy/paste the contents into Excel and it will format as a 3-column spreadsheet. Or you can save the file on your hard drive and open it with Excel or Notepad.
Dates
Displays the date range covered in the report
Run Date
Displays the date and time the report was generated,
- TIP: For more about reports and help running custom reports, email support@probono.net.
Area Utilities
The tools in this section allow you to do the following:
View Reports
This link takes you to the same page that the Site Reports section's View All link does. Click on this link to access reports older than the ones listed. Reports dating back to the period beginning June 1, 2003 are archived by year.
Follow these steps to use this tool:
- From the drop down list of practice areas, choose the one whose reports you wish to view (default will be the area you're currently in).
- Enter a year.
- Click the "List Reports" button.
- Click the title of the report you wish to view. Follow directions above to download report.
Bulk upload users as site members
This utility allows you to do a bulk upload of users to the area. Current members of probono.net and/or the site will not be overwritten. New users will receive an auto-generated email about their provisional membership, along with their password and username. New users will be required to change their passwords and complete their profiles as "provisional" members before being allowed access to the site.
Follow these steps to use this tool:
- Download and complete the Excel file provided. Complete all fields.
- Import the Excel file template and upload the excel file template using the "Upload" button.
Download roster as text file
This feature lets you download a report of all members on your site. All details (contact info, substantive areas of interest, member type, other area membership, date joined, member status, etc.) associated with each person are included. This report is best viewed with Excel. To do so, follow these steps:
- Click the Roster download link
- Choose Save rather than Open - if you choose Open, the report will open in Notepad and will be difficult to read
- Name the file and note where you save it.
- Open Excel. Under Files of Type, select All Files, then select the report you just saved and click Open.Choose Delimited and Next, then Tab and Next. Make sure column data format is General, and click Finish.
- NOTE: The downloaded roster file includes non-Approved members. To only view approved members filter by the ApprovalStatus column.
Set Meta Tag Information
Meta tags are descriptions and keywords that help search engines classify and rank your web page. This tool allows you to define three metatags:
Copyrights: This tag may contain copyrights, trademarks, patents, and other information to protect your intellectual property.
Keywords: Search engines that are supporting meta tags will often use the keywords tag to categorize your position in the search engine result pages. It is strongly suggested that you do not abuse this tag. Do not repeat same words multiple times and do not use unrelated keywords.
Description: One of the most important tags of all the meta tags. It should describe your web page with around 25 words or less. Do not enter manual line breaks.
Create link abbreviation
This tool is a handy way to shorten long urls. For example, if you are steering people to a specific calendar event and the url is long, shorten it here. Click it and:
- In another browser, go to the page whose url you wish to shorten and copy the url.
- Go back to the link abbreviation page and paste the long url into Long Link box.
- Click Create Short Link. A page will load with the new link. Use it in place of the long one.
Subscribe to Area Activity Stream RSS
This tool allows you to monitor submitted content, membership requests, and new reports by subscribing to this admin only RSS feed. You will need to use a RSS reader to subscribe to the feed. This tool is only available to geo area and practice area admins, it is not available to tool or contributor admins.
1. Click on the link to subscribe to the feed.
2. Follow the instructions for the RSS Reader you have chosen.
3. Once you subscribe to the feed, the top 25 items (news, members, events, library, cases) awaiting approval will appear. New reports will also appear in the stream for notification purposes only.
4. Click on the item you want to approve and you will be taken to the form on your site.
5. After you have changed the item's status from Awaiting Approval to anything else, it will be removed from your RSS stream (allow a little time elapse for it to refresh). If you do not change the status, it will not be removed from your RSS stream.
- NOTE: Most browsers have built-in RSS readers you can use, including Firefox Live Bookmarks. Outlook 2003 also has a built-in RSS reader.
- NOTE: This is a preauthenticated RSS feed, please do not share it!
- TIP: There are some RSS to email converter tools available that allow you to handle member/content approvals without checking the Admin Inbox each day (the updates go right to your email).
Manage Member Questions
This tool allows you to create and modify custom join form questions. Please contact support@probono.net if you have any questions about this tool.
Email Sharing
The new content submission email functionality allows for content to be submitted to a site’s library via email. Sharers use an email template, attach the desired resource (all accepted library file types, including HTML files, can be shared in), and then send the email to a specified address (different for each practice area). The resource will then appear in the Admin Inbox as “awaiting approval,” where the admin can review the resource just as they can with a normally submitted resource.
Who can share in?
As a default, all practice area members can submit library content via email. In addition, admins can designate authorized senders. An authorized sender is a non-practice area member who can submit content via email.
Designating Authorized Senders
Email addresses can be authorized and unauthorized through the Admin Inbox. Under Email Sharing in Area Utilities, admins can manage various aspects of the email sharing capacity. To view a list of authorized senders, click on Authorized Senders. To add or delete an email address, click on Sharing Relationships. To add a new authorized sender, select “New” and fill out the form provided, giving the email address and detailing the name of the relationship/sender. Then check “Enabled” and click Submit to create the relationship.
To suspend a relationship from the Sharing Relationships page, click on the name of the relationship to be taken to the relationship details page. Unclick “Enabled” and click Submit to temporarily suspend the relationship.
You can also delete a relationship from the Sharing Relationships page. To do so, select the checkbox next to the relationship you want to end and then click “Delete”.
How Resources are Shared In
Sharers submit resources by sending an email to the designated email address (the address is determined when email sharing is first enabled for the area). The email subject line will be the title of the resource. The body of the email is used to pre-populate various fields and the description of the resource. Information for the fields is provided using the template below. Anything written above and/or below the template will be put into the resource’s description. The template for submitting resources is:
- Organization:
- Document_Type:
- Creation_Date:
- Review_Date:
- Topic_Assigned:
Using the Template
The options for document type are the same as for normally submitted library resources – see Library Resource Guide . If left empty or entered incorrectly, the document type will default to “Other”. The Creation Date and Review Date can be entered in any of the following forms:
- mm/dd/yyyy
- mm/d/yyyy
- m/dd/yyyy
- mm/dd/yy
If the creation date is left empty or filled out incorrectly, it will default to the date the resource was submitted. If left empty, the Review Date will default to one year after the resource is submitted.
TIP: Unless the resource is time-sensitive, leave the Review Date empty so the resource is reviewed on a regular schedule
If desired, multiple topics can be added by separating them with commas. If the Topic field is left empty or filled out incorrectly (e.g. a non-existent topic is assigned), then no topic will be assigned to the resource. Similarly, if the Organization field is left empty on the template, then no organization will be listed for the resource in the Admin Inbox.
- Multiple Topic Example: Topic_Assigned: Child Welfare, Pro Bono, Other
Summary of Default Values if Template Fields left Empty or filled out Incorrectly
- Organization will be left blank
- Document Type will be other
- Creation date will be the submission date
- Review date will default to one year from the submission date
- No topic will be assigned
Admin Approval Process
Library resources shared in via email will appear in the AdminInbox in the same manner as normally submitted resources. Admins should follow their typical process for managing library content. They should add any necessary information that is not part of the email template, double check the template fields for errors and accuracy, and place the resource into a folder. As a reminder, the template fields are:
- Description
- Organization
- Document Type
- Creation Date
- Review Date
- Topic(s)
For more information on approving library resources see the Library and AdminInbox guides .
External RSS Feed Importer
Please click here to view more information about the RSS Feed Importer.